Friday 30 March 2012

Sad Gundam Is Sad

I'm sad. Sad that the helmet doesn't sit as comfortable as I'd hoped. The heavy V-fins drags things down a bit.


Threw the head, batteries and all, on a scale. 5.5lbs! Doesn't sound like much, but when most of that weight is 6 inches from your forehead. That weight doubles! At least it feels it. So, I have to consider further weight loss. I'll have to revisit the V-fins again. But, this will have to weight. I have other projects I want to tackle first.

Thursday 29 March 2012

The Damage


Grabbed all the receipts I collected for this project and did a tally. All the tools I had and some of the material (like the plastic) I had around the house, I won't add to the total. (But, I'll still give a rough price on them)


Tools I used:
Dremel tool with various attachments (cutting, drilling, buffing, sanding)
Sandpaper
scissors
pliers
needle-nose pliers
tweezers
X-acto blade handle
cutting mat
misc sized grippers/clamps/clips
soldering iron
heat gun
saw + mitre box
drill press
spray booth
airbrush + compressor


Here's the damage:
(10x) Superglue = $10
X-Acto blade refills = $1.59
Disposable gloves, measuring cups, brushes = $2 for the brushes (Had the rest)
Tamiya Putty = $7 (Already had it)
5 min Epoxy (2 part) = $1 (Already had it)
Plastic Cement = $2 (Already had it)
(7 cans of spray) Paint = $38.50
Hot glue sticks = $1 (Already had it)
duct tape (Already had it)
masking tape (Already had it)
Heat shrink wrap (Already had it)


Electronics:
(2x) 9v Batteries = $6
Wire-to-wire connectors = $25
Wires, (2x) micro fans, (4x) micro switches = $21
(2x) fashlights = $2
(50x) 3mm LEDs = $11
(6x) 3mm flashing LEDs = $12


Card stock = $7 (probably should've gotten this for free if I asked one of my friends that work at an office)
Resin = $30 (Already had this)
Sheen fabric for reinforcement = $7
HUGE sheet of 0.08 gauge plastic = ~$40 (Already had this)
3/4" (24 gauge) All Round Galvanized Bracing = $7? (Already had this)
(2x) Chicago Screws = $0.40
(3x) 1/2" round, 1/8" thick Rare Earth magnets = $4 (Already had this)
(3x) Decal sheets from Kinko's = $6


TOTAL: ~$149.49


That's with ALL the electronics. Not bad! It would be easily under $100 if I didn't choose to have any electronics or have the retractable face.

Tuesday 27 March 2012

Decal Description

The decal description:

1) Danger: Watch Your Limbs and Man/Woman washroom icons. Hey, pilots needs to go too!
2) Do Not Touch Boobies Without Specific Authority: Always Be Ninja-like
3) Danger: Hot Oil Not For Cooking
4) little grey marks under the machine gun... are tally/kill marks. (of ZAFT/FAITH kills)

5) QR code to this blog. Figured, I'd be tired to explaining my whole process over and over again. So, I'll just direct them to the code. Let them take a picture of it.. and peruse it on their own time. hehe
6) EFSF: Earth Federation Space Force
7) random stuff
8) just a close up shot of the camera lens

9) -Warning- Do not pull the envelope. Only push it.
10) Decal for my eyes only. Since it's in the inside of the helmet. It's to tell me what switch does what...in case I forget. Icons should be self explanatory.
11) Right side, near exhaust: Danger: Hot oil. Not for cooking
12) Pilot: Wiltonican

Monday 26 March 2012

Final Details

Here are some close-up shots of the helmet. Showing ALL the embarrassing blemishes that any supermodel would simply freak if it was ever shown on a magazine cover. I wasn't worried about them cause, frankly, no one's gonna see them... except you, here, online. When I'm wearing it, walking around... I'll be a blur.

Just for you guys, I've put in a few easter eggs in the decals. Can you spot them all?


Sunday 25 March 2012

FINALE!


Finally finished! Pretty happy with the results. 

- Roughly 2.5 months in the making (I really did take my time with it)
- It's running on 2x 9v batteries. 
- 4 switches: 
          1) 2 fans 
          2) 17 LEDs in V-fins, Mohawk lens, exhaust, and a couple in the ears 
          3) machine guns 
          4) 6x LEDs in the eyes
- Retractable faceplate. For extra vision, talking, eating, etc.

I'll post details in the next post.


Details Painted

Final Details Painted:

It's the final stretch of the build!


Masking the inside of the face again. To paint it matte black so the remainder of the wires are "invisible" Also painted the LED side that's face me. (So the glare won't hit my eyes)


Saturday 24 March 2012

Lighting up the Eyes

Was pretty busy with life the past couple weeks. Had very little time to get on this project. But, things are starting to settle again... so, it's back on target:

Lit Eyes:

The wiring for the eye LEDs are in place. All that's left to do here is paint the wires matte black and find a way to shield the bulbs so when they're lit, they won't cause a glare back at my eyes.


Had some leftover "turn signal amber" paint from my car models of the past that was the perfect shade I was looking for. Now, I had both yellow and amber paint. Tried them both, but found out the bluish tint of the LEDs made the yellow shine green. Whereas the amber paint plus the LEDs resulted in the standard Gundam yellow eyes. 
Good, the LEDs lit up the details just as I hoped.


Monday 19 March 2012

Lighting... teaser


Don't have time to work on the project today.

Only can give you a teaser of the lights so far. The lights for the eyes aren't in yet. The blue camera (mohawk) lens isn't in yet either.

This thing can light up a room!

EDIT: Just found out one of the LEDs in the yellow fin is busted!!!! The one that was permanently cemented in!!!!! ARRRGH. There's no easy fix for this. Only start scratch build another one!!!! sigh.

Sunday 18 March 2012

Final Paint... teaser

I think I'll save the final paint for "the final reveal" hehe


I am getting EXCITE!

Friday 16 March 2012

Eye Lens Redux

Eye Lens:

Here we go again! My second (and hopefully FINAL) attempt at making the eye lens for the build. 

To recap my requirements on this sub-project:
- Must not limit my vision, much
- Should have detail
- Tinted yellow
- Must be lit up.
- Lights must not be seen from the outside
- Lights must not be glaring back at MY eyes.

Had put a lot of thought back into this one. Going to start off with a piece of clear lexan plastic. I think this is good approach.
Since I already have the shape of the eye lens from the previous build attempt. I'm going to use it as a template for the curvature. Here I'm laying it down on a piece of 2x4 wood. I needed a shape to put the melting plastic onto. And the wood can handle the heat.

Cutting the shape out with a jigsaw.


I stole this toaster oven from my wife years ago. Started out when I was secretly baking my sculptures in it before. Got caught by the wife.. and said something, something.. and she just gave me the oven! Woohoo!! Score! Anyways, inside the oven is a couple strips of lexan plastic. Warming it up for 5-10 minutes. The moment I can see them droop, I pull them out and put it on my wooden form....

Almost lost this piece. You can see some bubbling at the corners! Luckily, the bubbles are outside and would be cut off.


Cutting them out with my dremel.

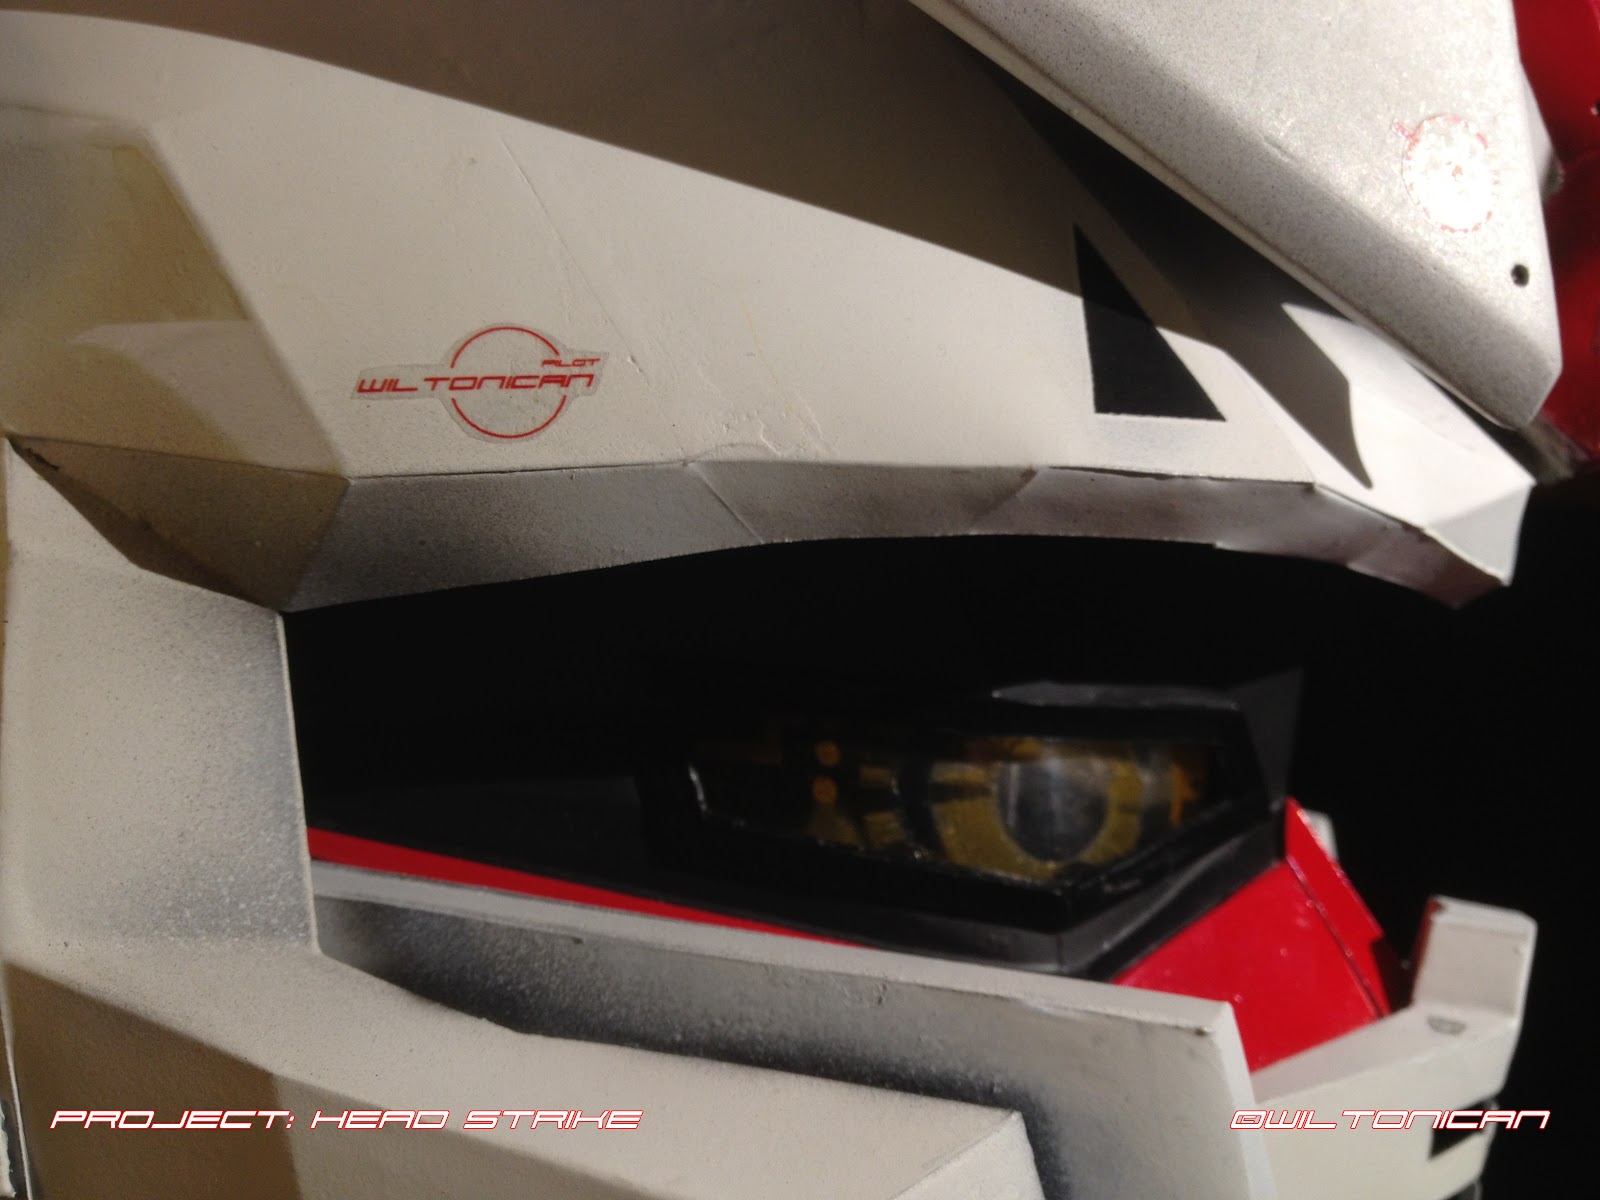
Quick test fit. PERFECT!

Now, for the details. I'm thinking of frosting them in. To achieve that, I just mask out a simple design. With my dremel again, I used a steel brush attachment, and just went over the exposed areas.

I could use some fancy window etching solution to frost the details. But, that would mean money. And I rather not spend money if I didn't have to. The return wasn't worth it. Simple economics. hehe

TEST: Can I see out of the new lens? 
Yes! Yes, I can. Even in the frosted areas, I can see vague shapes. So, this is successful.


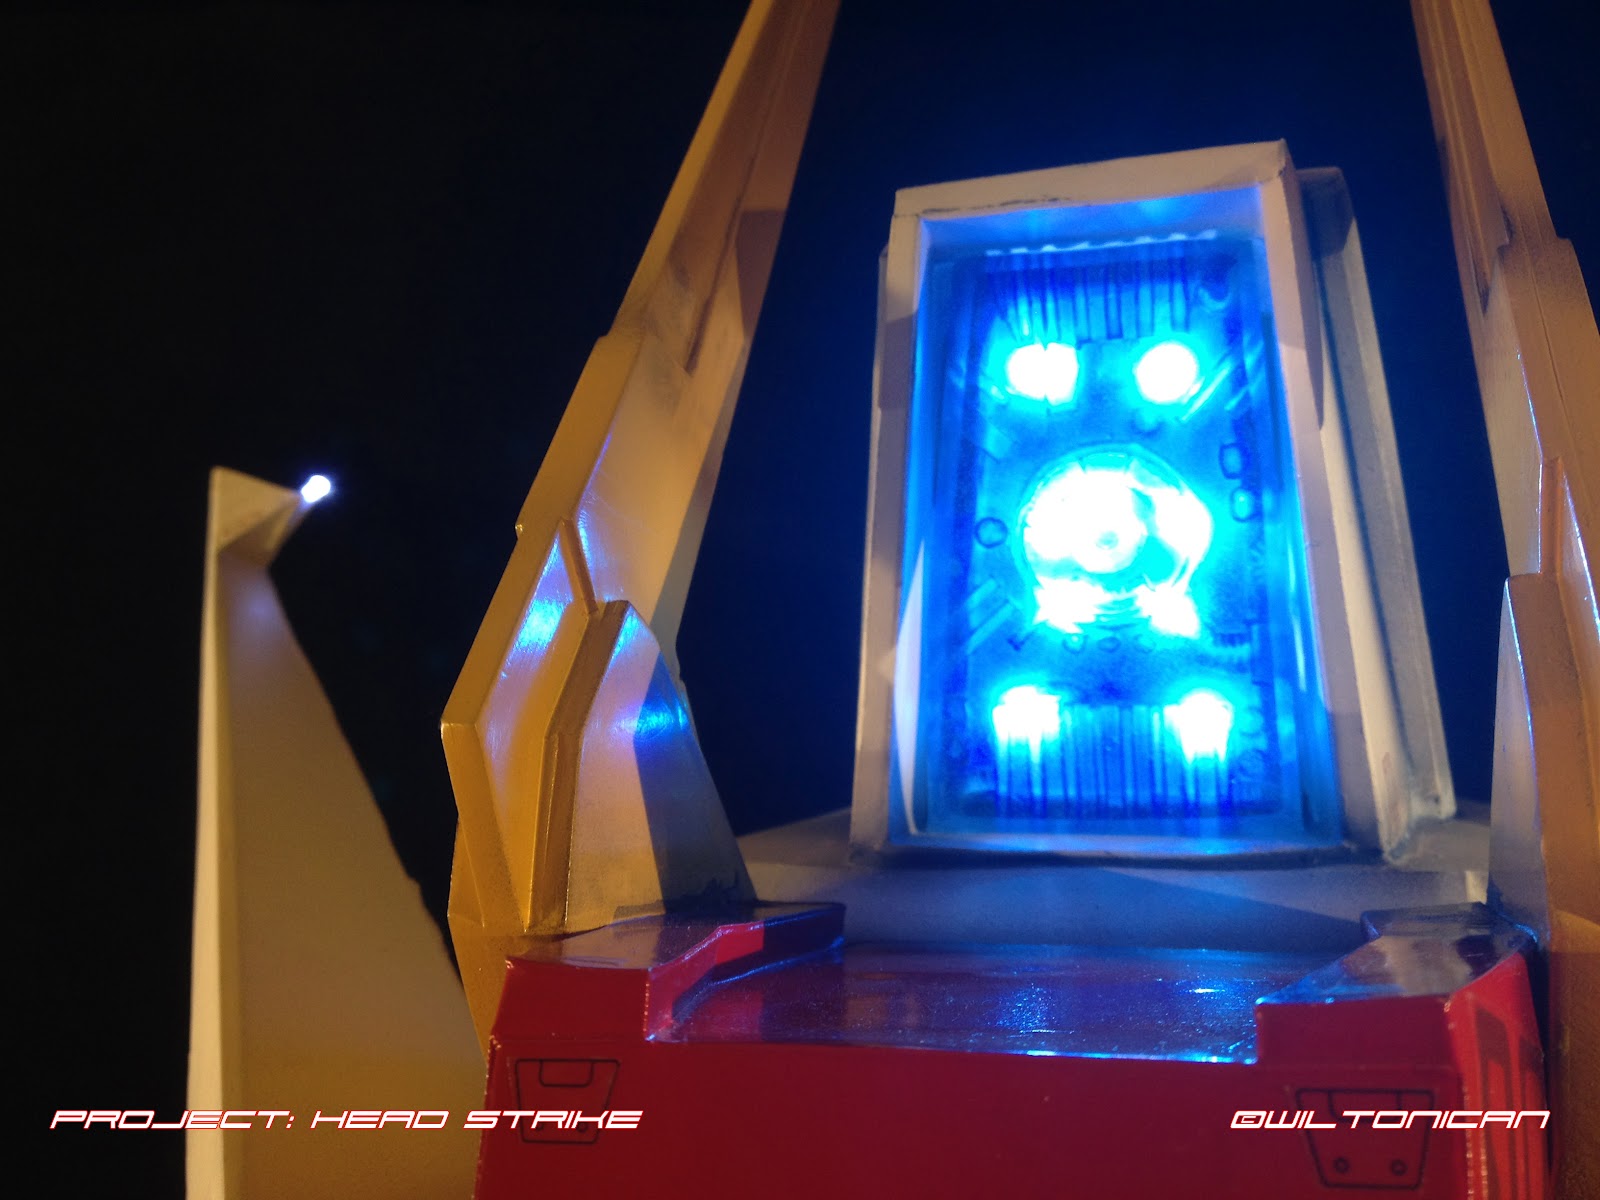
TEST: Does the detail light up? 
Yes, perfectly!! Success, again!

TEST: Are the lights visible from the outside? 
Nope. Since the lights would be mounted just out of sight. It's perfect again. Another Score!

TEST: Would the lights be glaring back into my eyes/face?
Nope, eventually, I will be mounting the LEDs with hot glue. Then I'll be painting the globs with dark matte paint. The light would only be directed at the lens itself.

PERFECT SCORE!!